
It has been one year since I painted my kitchen countertops with a DIY countertop paint kit and they still look great. Here’s how I did it along with the best tips I’d give anyone looking to do the same.
Ever since we moved into our house, I had plans to spruce up the kitchen. The floor was a deep pink tile, the Formica counters were pink, and the cabinetry, which was well-made and relatively new, was a light oak.

First, we replaced all of the floors in the entire house with new hardwood. Second, I hired someone to paint the cabinets a fresh, crisp white. Third, I rolled up my sleeves and painted the countertops.

Why did I paint my kitchen countertops?
For one, cost. We had already spent a TON of money on floors, furniture, and the house itself. But another reason is that, while I do like our kitchen as is, I’m not entirely sure that someday we won’t redo it (knock down the wall between the kitchen and dining room to make one larger kitchen), which would mean changing the placement of the counters completely.

I had heard of people painting their counters with good results, so I researched it—mostly by reading the Giani Granite website and watching YouTube videos of folks applying it. It seemed like something I could do.

What did I use to paint my counters?

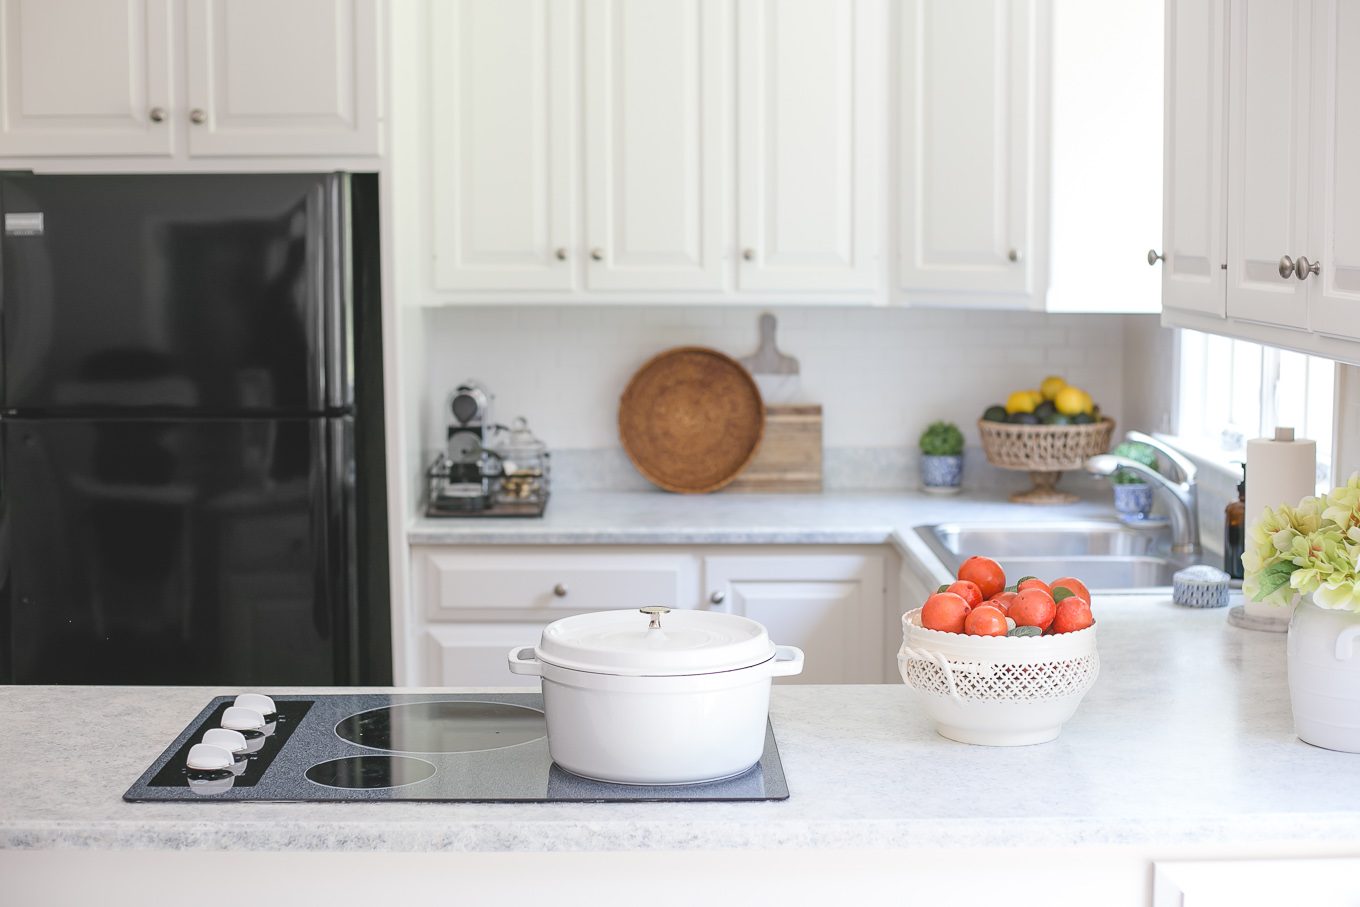
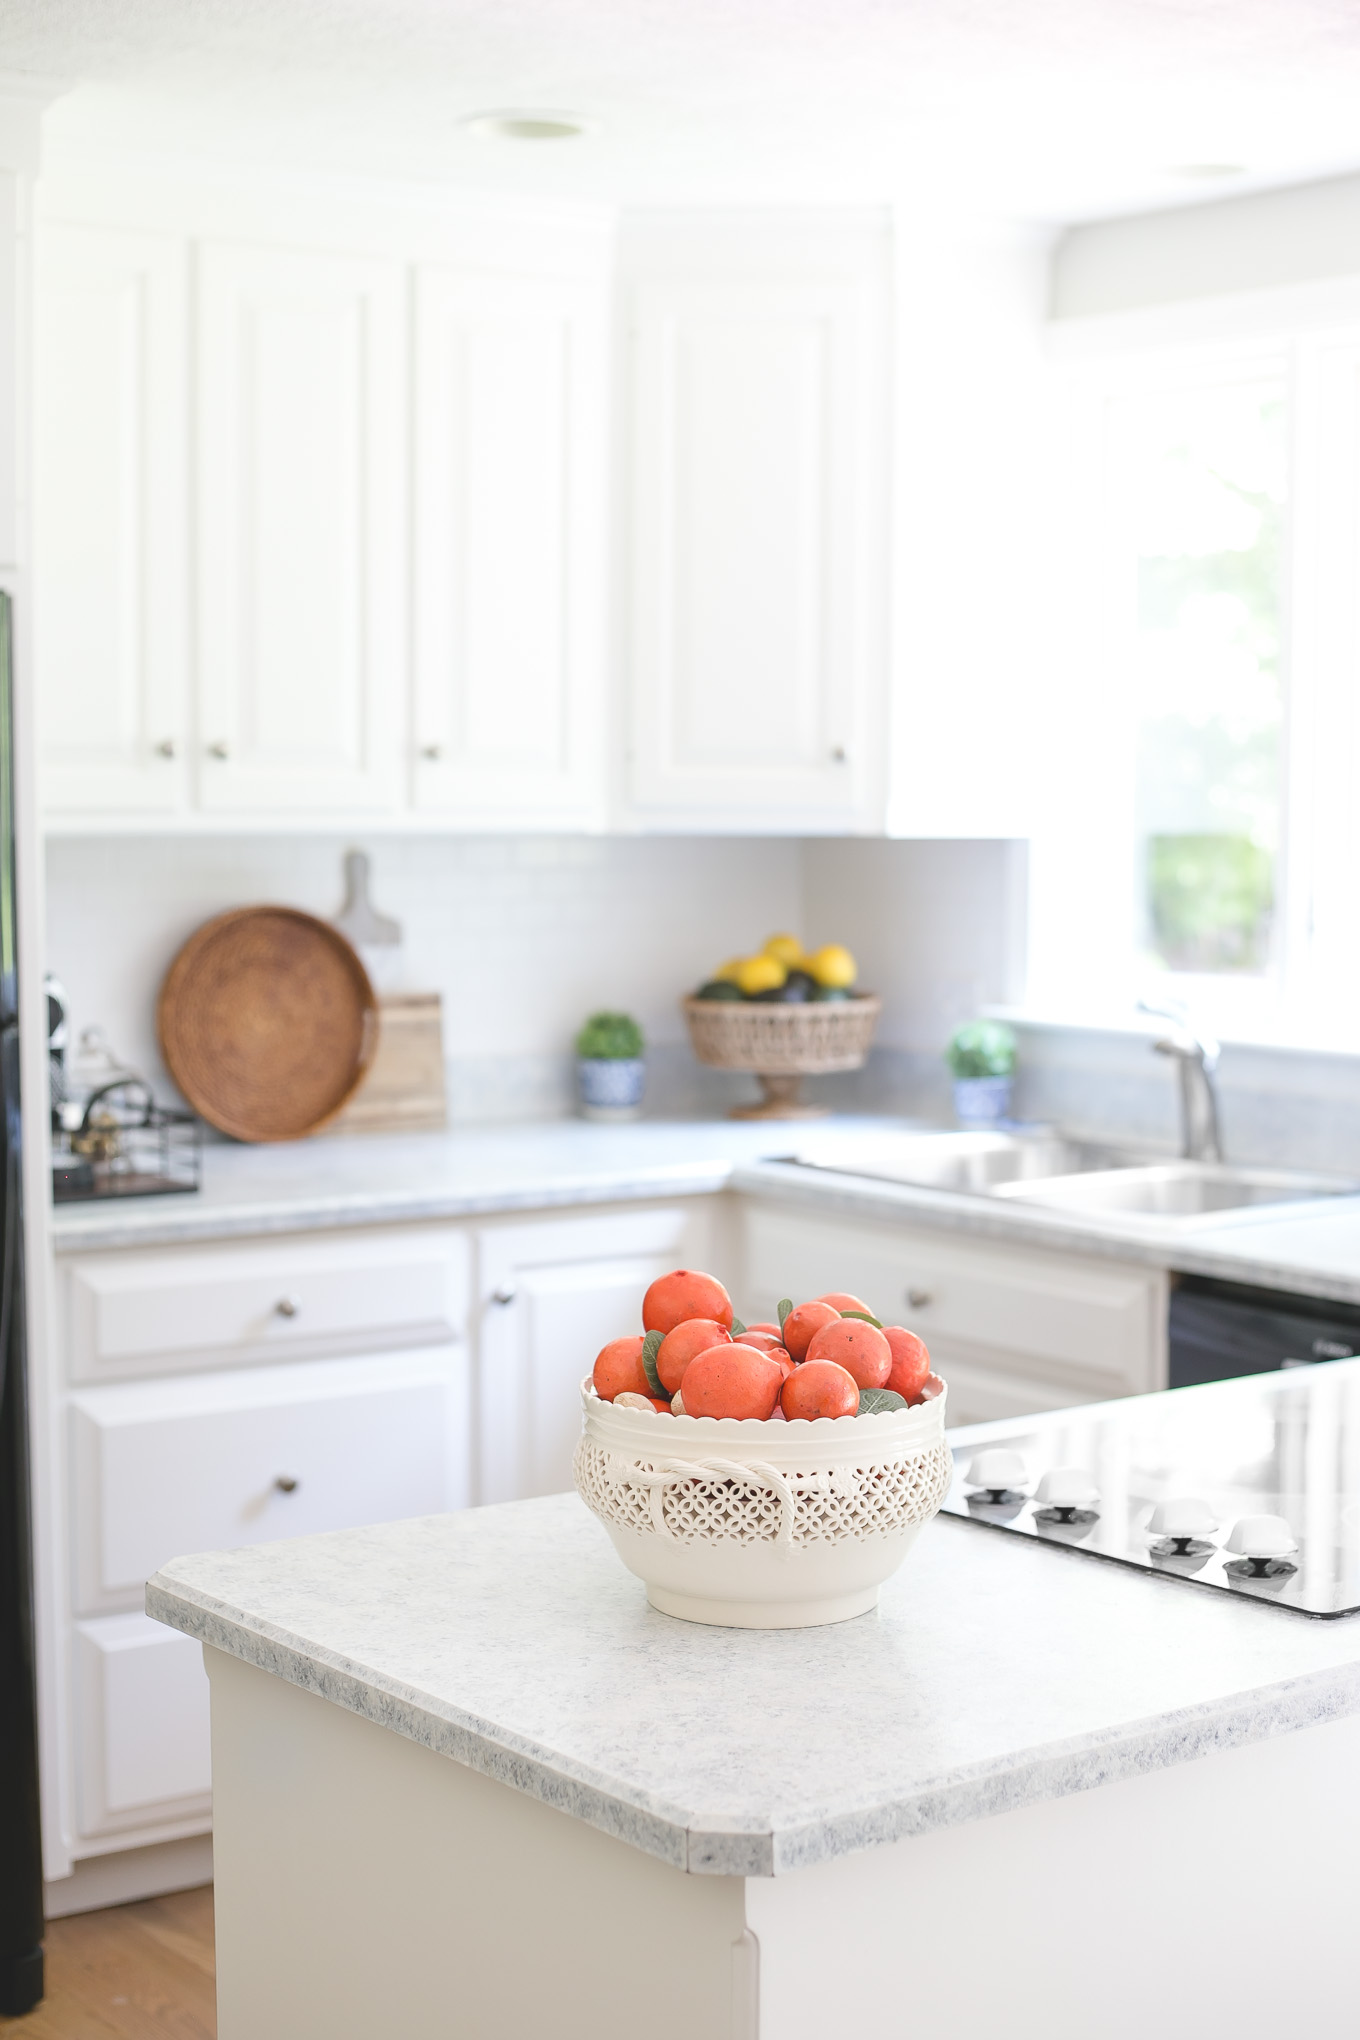
I used the Giani White Diamond Countertop Paint Kit. The kits come in multiple colors and styles but this Whtie Diamond shade that I chose is bright, light, and cool-toned with flecks of silvery white and gray. You can buy it directly on the Giani site or here on Amazon for a slightly cheaper price (Amazon affiliate link). The kit includes almost everything you need to paint your counters and very detailed instructions on how to do it (read the instructions here too). I’d highly recommend it.
Here’s what it looks like on your countertop:

Here are the contents of the kit:

How long does it take to paint your kitchen countertops?
With prep, priming, sponging each mineral, applying epoxy, and drying times, the whole project probably took 3 days, with 4-6 of those being active application (this amount of “active” time will vary from person to person).

How are your painted countertops holding up?
Very well. The final step of painting counters is applying a thin, protective layer of shiny epoxy. It effectively seals the paint and makes the counters more durable (less prone to chipping). In the past year, I have put these counters to the test—prepping and cooking hundreds of meals, entertaining friends and family, placing all kinds of appliances on them, spilling thousands of things on them, and I’ve cleaned them a million times with all kinds of products (most of which Giani would not recommend). Through all of that, they still look great. There are only a few minor knicks and dings and they’re from times when I’ve dropped something relatively heavy and sharp and the paint very slightly chipped (and when I say “chip” I mean there’s a mark the size of the tip of a ball point pen. I haven’t had any actual lifting of paint). And even in these instances, since the look of the counter is a faux granite (meaning it’s dimensional and includes several shades of color), it all blends right in.

Prepping the counters
Remove Caulking
I used a box cutter to remove the caulking around my sink and then wiped clean any sticky residue with rubbing alcohol. This step allowed me to paint as closely to the sink as possible (around and under any lips or seams). Note: You can re-caulk the area once the countertops are painted and dried.
Clean the Counters
I scrubbed the counters with an SOS pad to remove any and all grease and grime. Once the area was completely scoured, I used a wet washcloth (just water on it!) to wipe down the countertops and remove any lasting residue. I wrung out the washcloth, re-wet it, and wiped every surface twice.
Patch Any Cracks
My formica had light cracks in two places so I used wood filler to patch them and fill in the area. Since the cracks I filled were fairly superficial I didn’t need to sand the patched area afterward, but you may want to use a fine-grit sandpaper if your seams aren’t smooth. (If you use sandpaper, be sure to wipe away any fine dust with a wet washcloth).
Remove Switch Plates and Apply Painter’s Tape
I removed any switch plates and applied painter’s tape along the edges and sides of the countertops where they intersect with cabinets and above the backsplash. Note: Use two rows of tape (one on top of another) to create an extra wide tape border on your backsplash.

Apply the Primer
One important tip for painting countertops is to paint in 2-foot wide sections at a time, which felt a little counterintuitive to me at first. I figured I’d paint around the border of the countertops (along the backsplash and the front ledges) and then fill in the centers of the counters with paint. But I’ve learned that doing this would have meant the paint dried unevenly, something you don’t want when you’re going for a smooth, professional finish. This will be especially important when it comes time to sponge on the mineral paint).

So, to begin working on ONE 2-foot section at a time, use the foam brush to paint a thin line of primer along the top and bottom of your backsplash, then roll a thin layer of primer onto the backsplash, then roll onto the counters. Move onto the next 2-foot section immediately before the paint completely dries on the previous section.
Once all of the countertop is primed, let it dry for 8 hours.
Tips on Applying the Mineral Paint
- The best tip I can offer you when it comes to using the sponge to apply mineral paint is to use a light touch. If you press the sponge too firmly on the counter, you’ll end up with a big blob of paint. You’ll get the hang of it when you practice your technique on the black cardstock they provide in the kit.
- Remember to work on one 2-foot section of counter at a time. DO NOT sponge the whole countertop with one color and allow it to dry before adding the next color. You want each layer of sponged mineral paint to be wet while applying the next color so that they blend well.
- Allow some of the primer to peek through (to provide depth of color), but you want each sponge print to gently overlap the other to create a layered, softly blended, sort of blurred look.
- For tough to reach spaces, creases, and the backsplash, you’ll need two tools: a small, fine tipped paint brush and a small piece of sponge attached to the tip of a pencil (cut a tiny piece of sponge off of the large piece and tape it or glue it to a pencil or any long instrument). The creases are tricky. Take your time and remember it’s easier to apply more than it is take color away.


Helpful Videos
Video of general application of Giani kits with helpful tips
Video of the application process of the White Diamond Kit

Looks amazing! Great job!
Holy cow this is amazing! I am totally doing this in our home! I’ve seen it done before but never have gotten to see a first hand look of someone’s usage of it and how it works. Thanks for posting this!
I’m so impressed! You did a great job, Andi. You have me rethinking what I can tackle in the kitchen. The bones of my cupboards are still OK but they’re worn. Possibly new paint and this on my peach (yes, peach) countertops will be the most affordable option and easier on the landfill vs. dumping the old countertops.
Always enjoy your posts. Hope you are all doing and feeling well now.
Never heard of the DIY project of painting a faux granite look. You did a fantastic job. Looks beautiful and works perfectly in your kitchen. Thanks for sharing. Kathy
Looks great. I am interested, yet a little nervous, to try this. My counter and backsplash are both granite, how did you spread the final clear coat on your backsplash? Can it be painted on instead of poured in that section?
Does the epoxy come in the kit or did you buy it separately? Need to know what epoxy you used. :)
Hi Tina! Yes, the epoxy comes in the kit!
If I am buying a new sink should I take it out first and paint countertops or go ahead and replace it then paint?
Hi
Does it work on granite countertops?
Where did you order your floors from?
I absolutely love how your kitchen countertops turned out! Your step-by-step process is so inspiring, and the photos really show the transformation. I can’t wait to try this myself. Thanks for sharing your tips!
I absolutely love how your kitchen countertops turned out, Andie! The color choice is stunning, and it really brightens up the space. Thanks for sharing your process and tips—I can’t wait to try this in my own kitchen!
I love how you transformed your kitchen countertops! The color choice is so refreshing and really brightens up the space. Thanks for sharing your process; I can’t wait to try this in my own kitchen!
I absolutely loved reading about your countertop painting journey, Andie! The tips you shared were super helpful, especially the part about prep work. Your before-and-after photos are inspiring—my kitchen could really use a refresh like that! Thanks for the motivation!
I absolutely love how your countertops turned out, Andie! The color choices are so fresh and vibrant. I never thought about painting mine, but your step-by-step process makes it seem totally doable. Can’t wait to try this in my own kitchen!
I absolutely loved your post, Andie! Your tips on prepping the countertops were super helpful, and the transformation is just stunning. I can’t believe how much of a difference it made in your kitchen. I’m feeling inspired to give my own counters a fresh look now! Thanks for sharing your process!
I absolutely love how your kitchen countertops turned out! The transformation is incredible, and your step-by-step process is so helpful. I can’t wait to try this in my own kitchen. Thanks for sharing your creativity and tips!
I loved your transformation process, Andie! The color you chose is so refreshing and really brightens up the kitchen. Thanks for sharing your tips and tricks—I can’t wait to try this in my own home!
I absolutely loved your post, Andie! I never thought painting countertops could create such a stunning transformation. Your tips on prep and technique were super helpful. I can’t wait to try this in my own kitchen – thanks for the inspiration!
This is such an inspiring transformation, Andie! I love the color you chose for the countertops, and your step-by-step process is super helpful. I’m definitely considering trying this in my own kitchen. Thanks for sharing your tips!
I love how you transformed your kitchen countertops! The color choice is beautiful and really brightens up the space. Your step-by-step process was super helpful, and it’s inspiring to see how paint can create such a big change. Can’t wait to try this in my own kitchen!
I absolutely loved reading about your countertop transformation, Andie! The colors you chose are so vibrant and really brighten up the kitchen. Can’t wait to try this project myself – your tips are super helpful!
Türkiye Genelinde Güvenli ve Dayanıklı Çelik Kapı Çözümleri
Play Wordle Unlimited Game Online with unlimited words! Wordly is a spinoff of the famous online Wordle game. Play unlimited games for free.
Wow, Andie! Your kitchen looks amazing after the transformation. I never thought about painting my countertops, but your step-by-step process makes it seem so doable. Thanks for sharing the tips and tricks—you’ve inspired me to give it a try!
I loved your step-by-step guide, Andie! The transformation of your kitchen countertops is incredible. I can’t believe how much of a difference the paint makes! I’ve been thinking about updating mine, and your tips are super helpful. Thanks for sharing your process!
I loved reading about your countertop painting process! Your tips are so helpful, and I can’t believe how great they turned out. I might just have to try this in my own kitchen. Thanks for sharing your journey!
Wow, Andie! Your transformation of the kitchen countertops is incredible! I love the colors you chose, and your step-by-step process is super helpful. I can’t wait to try this in my own kitchen. Thanks for sharing your tips and encouraging creativity!
AnoBoy.nl offers free streaming and downloads of Indonesian-subbed anime, updated regularly with new episodes.
Thanks for sharing. I read many of your blog posts, cool, your blog is very good.
What a fantastic transformation, Andie! I love how the painted countertops brighten up your kitchen. Your step-by-step breakdown was super helpful—I’m definitely inspired to try this in my own space!
AnoBoy is a free Indonesian anime streaming and download website offering a wide range of shows with Bahasa Indonesia subtitles—from 240p to 720p resolution. It features new and ongoing series, genre filtering, and a regularly updated library. The site itself doesn’t host any anime—it aggregates content from third-party sources.
Greetings, I think your website could be having web
browser compatibility issues. When I look at your blog in Safari, it looks fine but when opening in I.E., it’s
got some overlapping issues. I merely wanted to provide you with a quick heads up!
Apart from that, wonderful blog!
This looks amazing! I love how painting countertops can completely refresh a kitchen without a full remodel.
A formidable share, I simply given this onto a colleague who was doing a little bit analysis on this. And he in actual fact bought me breakfast as a result of I discovered it for him.. smile. So let me reword that: Thnx for the treat! But yeah Thnkx for spending the time to debate this, I really feel strongly about it and love reading more on this topic. If possible, as you become expertise, would you thoughts updating your blog with more particulars? It is extremely useful for me. Huge thumb up for this blog publish!
Thank you for the information in this article. Excellent work
I love how your countertops turned out, Andie! The color you chose really brightens up the space. Thanks for sharing the process and the tips! Can’t wait to try this in my own kitchen!
I love how you transformed your kitchen countertops! Your step-by-step process was so helpful, and the color choice is perfect. It looks fresh and inviting! I might have to try this in my own kitchen. Thanks for sharing!
Welcome to Anoboy Official Download Nonton Online Streaming Anime Subtitle Indonesia Kualitas Tinggi tersedia 240P 360P 480P 720P.
AnoBoy offers free streaming and downloads of Indonesian-subbed anime, updated regularly with new episodes.
This kitchen makeover is really inspiring, especially how smart planning and the right process helped achieve such a great result without a full renovation. In Dubai, even small upgrades like kitchen refurbishments can benefit from proper guidance and DM approvals, particularly for fit-outs or structural changes. That’s where experienced teams like Atech Interiors LLC make a big difference by handling Dubai Municipality approval services smoothly and quickly, so homeowners and businesses can focus on design and execution with peace of mind. A well-managed approval process truly helps turn creative ideas into successful, stress-free projects.
Nikmati streaming anime gratis di Anoboy – platform pilihan untuk anime terbaru & film dalam kualitas HD. Tersedia update cepat, judul populer, dan pengalaman streaming yang lancar untuk penggemar anime di Indonesia.
I absolutely loved your kitchen countertop transformation! The step-by-step process you shared made it feel so doable. I can’t wait to try this in my own kitchen. Thanks for the inspiration!
Wow, Andie! I love how you transformed your countertops! The step-by-step guide was super helpful, and your tips on choosing the right paint made it all seem doable. Can’t wait to try this in my own kitchen! Thank you for sharing your experience!
What’s up colleagues, how is the whole thing, and what you would like to say about this paragraph, in my view its actually awesome for me.
I love how your countertops turned out! The color choice is spot on and really brightens up the kitchen. I never would have thought to paint my countertops, but your step-by-step guide makes it seem doable. Can’t wait to try this in my own kitchen, thanks for the inspiration!
This is a topic that’s near to my heart… Take care!
Where are your contact details though?
Great post. I was checking continuously this blog and I’m inspired!
Extremely useful information specially the final part :) I care for such information much.
I used to be seeking this certain info for a very long time.
Thank you and best of luck.
Thank you, I have just been searching for information approximately this topic for a long time and yours is the greatest I have found out till now. However, what in regards to the bottom line? Are you certain in regards to the source?
Attractive portion of content. I just stumbled upon your web site and in accession capital to assert that I acquire actually loved account your weblog posts. Anyway I’ll be subscribing to your feeds and even I fulfillment you get entry to constantly fast.
I absolutely loved this post, Andie! Your step-by-step guide made the process seem so achievable, and the before-and-after photos are stunning. I can’t believe how much of a difference it makes! I’m definitely inspired to tackle my own countertops now. Thank you for sharing your experience!
All the UIDAI Services easy-to-follow info and tips on My Aadhaar. Update, Download, Appointment, Enrolment, Order PVC Card, Check Status 2026.
I absolutely love the transformation! Your tips on prep work and choosing the right paint were super helpful. Can’t wait to try this in my own kitchen! Thanks for sharing your process!
I couldn’t resist commenting. Very well written!
Wow, Andie! Your transformation of those countertops is incredible! I love the color you chose, and the step-by-step guide was super helpful. Can’t wait to try this in my own kitchen. Thanks for sharing your process and tips!
Useful information. Lucky me I found your site accidentally, and I’m surprised why this accident didn’t happened in advance! I bookmarked it.
Wow, Andie! Your kitchen countertops look amazing after the transformation! I love how you made such a big change on a budget. Thanks for sharing the process and tips – I can’t wait to try this in my own kitchen!
are cutting-edge online streaming platforms that provide anime lovers with high-quality content absolutely free. Featuring a clean, ad-free interface and a vast collection of both subbed and dubbed options, they deliver a premium and seamless viewing experience for every user.
are cutting-edge online streaming platforms that provide anime lovers with high-quality content absolutely free. Featuring a clean, ad-free interface and a vast collection of both subbed and dubbed options, they deliver a premium and seamless viewing experience for every user.
are next-generation streaming hubs designed specifically for the ultimate anime fan. Offering an extensive library of crystal-clear subbed and dubbed series completely free of charge. They eliminate annoying ads to ensure your binge-watching sessions remain entirely uninterrupted, it is a premium, seamless, and high-speed viewing experience from the very first click.
are cutting-edge online streaming platforms that provide anime lovers with high-quality content absolutely free. Featuring a clean, ad-free interface and a vast collection of both subbed and dubbed options. They deliver a premium and seamless viewing experience for every user